TL;DR
Moving your rig into another room offers the biggest noise reduction, but if you want it in your closet, focus on good placement, sealing gaps, and combining absorption with ventilation. Foam alone won’t cut it for soundproofing; sealing and decoupling matter more.
Imagine a tiny closet packed with a high-power AI rig. It roars, it heats, and it echoes. Yet, with the right tricks, that chaos can stay hidden behind closed doors.
This guide isn’t about fancy gear or expensive soundproof rooms. It’s about smart placement, clever dampening, and turning your closet into a functional, quiet studio. Whether you’re recording vocals or running inference, you’ll learn how to tame that noise and make your space work for you.
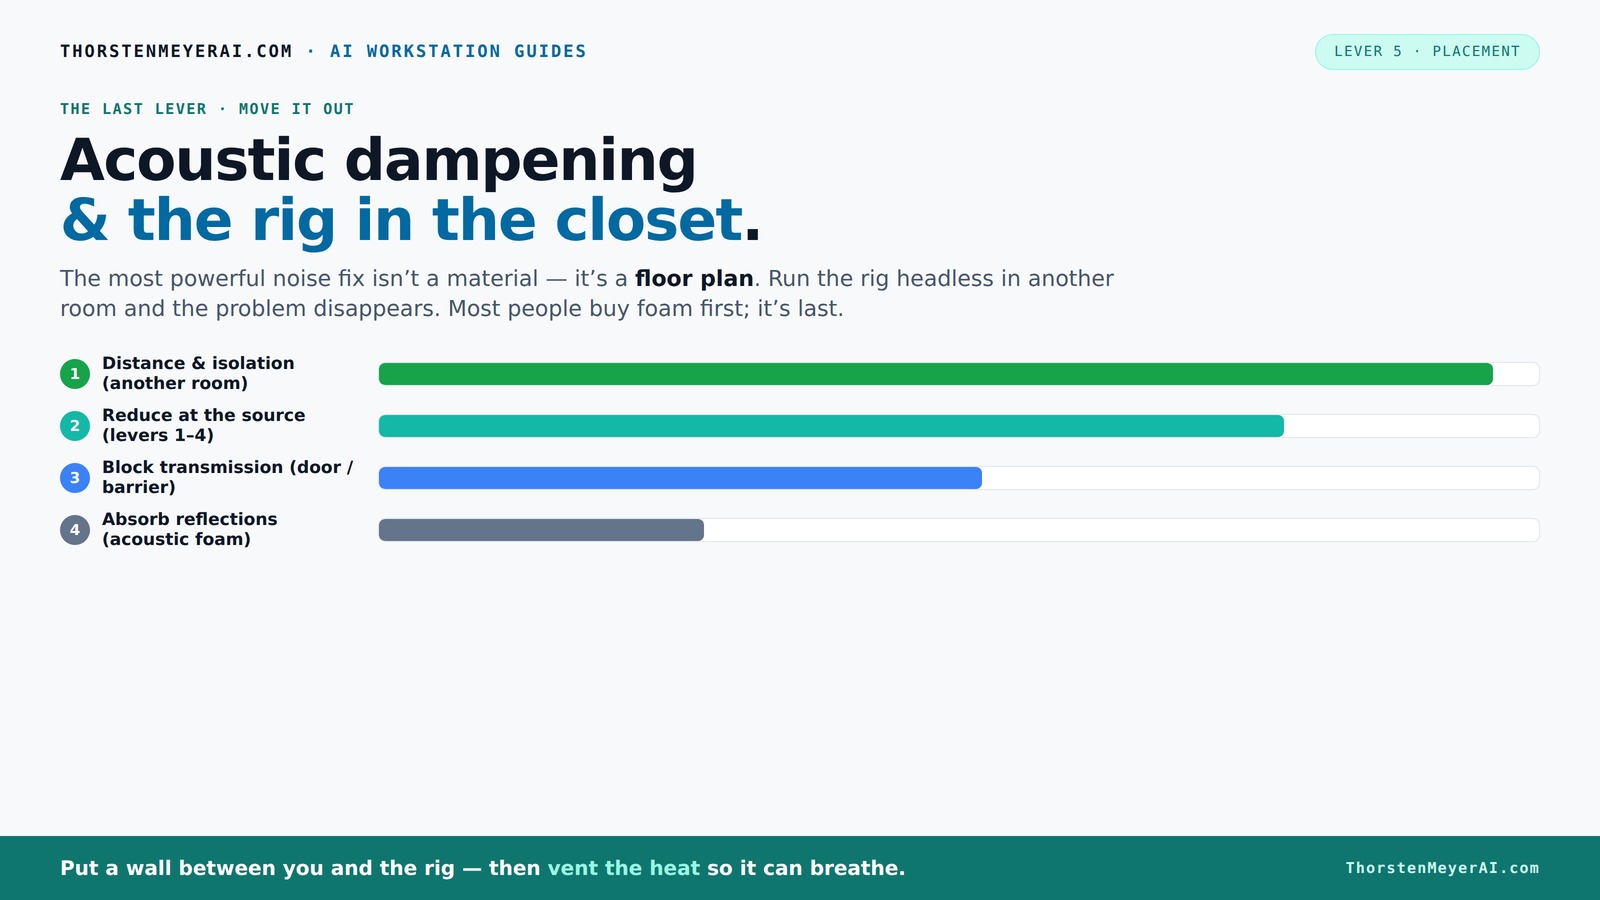
Acoustic dampening
& the rig in the closet.
The most powerful noise fix isn’t a material — it’s a floor plan. A rig you can’t hear because it’s in another room beats any amount of foam. Tap the approaches in Part 1 to see what actually works.
(another room)
(levers 1–4)
(door / barrier)
(acoustic foam)
Contain the noise, not the heat
Key Takeaways
- Moving your rig to another room eliminates most noise, but if in a closet, combine sealing, absorption, and ventilation.
- Placement of mic and equipment is critical — aim away from reflective surfaces and corners for the clearest sound.
- Foam alone won’t stop sound leakage; sealing gaps and adding density matter more for isolation.
- Corners and low-frequency treatment reduce bass buildup, but broad wall coverage improves overall sound quality.
- DIY materials like blankets, foam, and rugs are effective, but always test and adjust based on your space.

Focusound 52 Pack Acoustic Foam Panels 1" x 12" x 12" Sound Proof Foam Panles Soundproofing Noise Cancelling Wedge Panels for Home Office Recoding Studio with 300PCS Double-Side Adhesive
Soundproofing - Acoustic foam panels triangular grooves structure for better noise absorption, helps to reduce and absorb unwanted...
As an affiliate, we earn on qualifying purchases.
As an affiliate, we earn on qualifying purchases.
Why a closet can actually be your best soundproofing secret
If you think bigger is better, think again. Small spaces like closets can sometimes give you more control over reflections and bass buildup than large, untreated rooms. You can learn more about acoustic dampening and placement.
A closet acts as a box — trapping sound and reducing echo naturally. However, this natural containment comes with tradeoffs: while it can help contain noise, it also amplifies low-frequency resonances and can make your recordings sound boomy or muffled if not properly treated. The key is to use absorption strategically to tame these bass issues and sealing to prevent sound leaks. For more tips, see acoustic dampening and sealing. Combining these methods turns the small space from a potential echo chamber into a controlled environment. Properly managing this balance is crucial: too much absorption can deaden the sound, while insufficient sealing allows noise to escape. Your goal is to create a balanced, acoustically friendly space that minimizes both echo and noise leakage, understanding that each treatment choice affects the overall sound character and isolation effectiveness.
Understanding these tradeoffs helps you prioritize what matters most — whether it's reducing echo, controlling bass, or preventing noise leaks. For example, overusing absorption might deaden your sound, making recordings sound dull, while neglecting sealing might let too much noise escape, defeating the purpose of your setup. Striking the right balance means considering your specific needs: if you record vocals, controlling reflections might be paramount; if you run a noisy rig, sealing gaps to contain sound becomes critical. The art lies in customizing your treatments to achieve a natural, clear sound without sacrificing isolation.

Audimute Soundproofing Acoustic Door Seal Kit - Door Sweep and Seal - (Large Size)
Includes (2) Door Seals (3/16" x 1/2" x 50') and (1) Door Sweep (1/2" x 1.5" x 25').
As an affiliate, we earn on qualifying purchases.
As an affiliate, we earn on qualifying purchases.
Where to place your microphone and rig for the best sound and least noise
Placement is king. Position your mic and rig where they’ll produce the least reflections and noise. For detailed guidance, check out kitchen techie’s advice on optimal setup. Start by pointing your microphone toward the most absorbent surface — usually a wall covered with blankets or foam.
In a closet, avoid placing your microphone directly against a wall or in a corner, which amplifies bass buildup and creates problematic standing waves. Instead, position it about 6-12 inches away from the wall, preferably on a stand or isolation pad. This distance helps prevent low-frequency buildup and reduces proximity effect issues that can color your sound. For your rig, keep it away from the microphone and reflective surfaces like bare walls or hard floors to minimize sound bouncing back into the mic. Using a desk with a thick rug underneath can absorb bounce and echo, further improving clarity. Remember, strategic placement isn’t just about convenience; it directly impacts the fidelity and noise floor of your recordings. Using a simple test — clap loudly in your usual position and listen for hotspots — allows you to identify and treat reflection points more effectively, leading to cleaner recordings with less ambient noise.
Why this matters: Proper placement reduces the chance of unwanted reflections and low-frequency buildup, which can muddy your recordings or introduce noise. Learn more about optimal placement techniques. It also minimizes the proximity effect and prevents your rig from amplifying noise sources. Recognizing the importance of placement means understanding that even small shifts can dramatically improve clarity and isolation, saving you time and effort in treatment later. The tradeoff is that poor placement can make your treatments less effective, forcing you to add more absorption or sealing later, which complicates your setup and can impact your workflow.

Trademark Soundproofing Mass Loaded Vinyl 1lb - MLV Soundproofing for Wall Sound Barrier - Sound Insulation - Made in USA - 4' x 25' Covers 100 sf - Made in USA
High-Efficiency Sound sound barrier quiet wall with a proven 27 STC rating - 1/8 inch thick dense rubberlike...
As an affiliate, we earn on qualifying purchases.
As an affiliate, we earn on qualifying purchases.
What parts of your closet need treatment — and how to do it right
The biggest reflection points are the wall behind your mic, the side walls, and the ceiling. Cover these with acoustic panels, blankets, or foam to absorb sound. Focus on the areas where sound bounces back directly into the mic.
Don’t forget the door. A standard closet door is a weak point. Seal gaps with weatherstripping or hang a moving blanket in front of it to block sound leaks. Proper sealing prevents sound from leaking out and reduces the need for excessive absorption inside the space. For small closets, covering 70-80% of the walls with 2-4 inch thick panels can drastically reduce reflections and flutter echoes, creating a more controlled environment. Use thick blankets or acoustic foam on the ceiling and door, especially if the space is very tight. Additionally, placing a soft rug or carpet on the floor helps to absorb bounce and prevent sound from reflecting off hard surfaces. These combined treatments help balance absorption and containment, ensuring your recordings sound clear and isolated while preventing sound from escaping.
Understanding which surfaces to treat and how to do it effectively is crucial because it directly impacts the room's acoustics. For comprehensive tips, visit soundproofing strategies. Over-treating can deaden the sound, making recordings dull, while under-treating leaves reflections and echoes that muddy the audio. The key is to identify the main reflection points and treat them adequately, balancing absorption with containment. For example, covering the ceiling might seem minor but can significantly reduce flutter echoes, while sealing gaps around the door prevents sound leaks that compromise your isolation. Proper treatment involves strategic placement of absorptive materials, ensuring they target the most problematic reflection paths without overloading the space with unnecessary treatments.

Bifold Doors, 60"x 80" 3-Lite Tempered Frosted Glass Closet Door with Hardware Kit, Pre-Assembled Interior Bi Fold Doors for Pantry/with PVC Surface, Solid Build Quality & Easy Install, Black
PRODUCT SIZE: Door Panels Total Width: 59.45", Height: 78.5", Thickness: 0.83", for openings 60" wide and 81-80.375" high....
As an affiliate, we earn on qualifying purchases.
As an affiliate, we earn on qualifying purchases.
Best materials for DIY closet soundproofing and absorption
Heavy blankets, moving blankets, and acoustic foam are your friends. Heavy blankets can absorb reflections and are easy to hang, while acoustic foam panels, especially 2-4 inch thick, target mid and high frequencies effectively. The thicker the foam, the better it attenuates higher frequencies, but for bass and low-frequency control, you'll need denser materials or specialized traps. Bass traps or thick foam corner panels help prevent low-end resonances that can make your recordings sound boomy or muddy. These low frequencies tend to accumulate in corners due to boundary effects, so treating these areas is essential for a balanced sound. Use grommets, hooks, or command strips for easy hanging. A mix of materials — blankets on walls, foam on reflection points, and rugs on the floor — creates a balanced sound environment. Layering blankets and foam enhances absorption, especially if your closet has many hard surfaces. Keep in mind that each material contributes differently: blankets add mass and broad absorption, foam targets mid-high frequencies, and bass traps address low-end issues. Combining these strategically yields the best results.
Choosing the right materials involves understanding their acoustic properties and how they interact. Heavy blankets add mass, which helps block sound transmission and broad-spectrum absorption, but they might be less effective at targeting specific frequencies. Foam panels are lightweight and excellent for mid-high frequencies but less effective at low frequencies unless thick or dense. Bass traps are essential for controlling low-end resonances; placing them in corners intercepts the buildup of bass energy, preventing muddiness. Layering these materials—such as hanging blankets to dampen reflections, placing foam at reflection points, and installing bass traps—creates a comprehensive treatment plan that addresses the full spectrum of sound. The tradeoff is that more treatments can take up space and may be visually intrusive, so balancing effectiveness with practicality is key for a functional workspace.
How to handle bass buildup and low-frequency problems in a small closet
Low frequencies are the trickiest in small closets. They cause that annoying 'boomy' sound and standing waves, especially with parallel walls. To combat this, add bass traps in the corners where low-end tends to build up. These traps absorb energy that would otherwise resonate and cause muddiness, making your recordings clearer and more balanced. Place bass traps in all corners — floor-to-ceiling if possible — to intercept low-frequency waves at their boundary points. If space is tight, foam corner panels or DIY bass traps made from rockwool or dense insulation wrapped in fabric work well. Proper placement is crucial: the more low-end energy you can absorb at its source, the cleaner your sound will be. Adjust placement based on your measurements; using a frequency generator app to identify problematic frequencies helps target treatments more precisely. Sometimes, simply shifting your microphone slightly or adding a thick blanket behind it can reduce bass resonance, providing a more natural and controlled sound. These steps, combined with strategic placement of bass traps, effectively reduce low-frequency muddiness, resulting in recordings that are tight and well-defined.
Addressing low-frequency buildup is essential because these frequencies tend to dominate and color your recordings, making them sound muddy or boomy. In small spaces, standing waves form easily because parallel surfaces reflect low-end energy back and forth. Without proper treatment, these resonances can cause uneven frequency response, making your recordings sound unnatural. Using bass traps in corners reduces the energy at these problematic frequencies by absorbing the low-end sound at its boundary points. This targeted approach prevents low-frequency resonances from amplifying excessively. Additionally, strategic placement of soft materials behind the microphone and around the space can diffuse low frequencies, preventing them from dominating the sound. Regularly measuring your room’s response with a frequency app helps identify specific problem areas, guiding precise treatment. This comprehensive approach ensures your recordings are tight, balanced, and free of boomy resonances that diminish clarity and professionalism.
DIY vs. professional modifications: what’s worth it?
DIY solutions are incredibly effective and budget-friendly. Using blankets, foam, and sealing strips, you can turn a closet into a decent recording space without breaking the bank. Many creators share step-by-step guides for building DIY booths with curtains, blankets, and simple framing, allowing you to customize your setup and address specific acoustic challenges. However, DIY treatments often require trial and error, and may not achieve the same level of isolation as professional solutions. On the other hand, professional soundproofing involves custom-built panels, sealed doors, and ventilation systems. These are more expensive but deliver higher isolation and consistent sound quality, especially for vocal or instrument recording. They also tend to be more durable and less visually intrusive. If your goal is a quiet, functional space for voice-over or streaming, DIY is often sufficient and allows flexibility. For professional-grade recordings, especially if you're dealing with loud instruments or need maximum isolation, investing in professional-grade acoustic treatment and custom enclosures can be worthwhile. Evaluate your needs, budget, and space to decide which path offers the best balance of cost and performance.
Understanding the tradeoffs between DIY and professional modifications is crucial because it influences your workflow, budget, and final sound quality. DIY solutions provide a high degree of customization and can be tailored to your specific space and needs, but they may lack the consistency and durability of professionally engineered treatments. Professional modifications, while more costly, often deliver superior isolation and acoustic precision, which can be essential for critical recordings or professional production. The decision depends on your priorities: if you need a quick, affordable setup for casual or semi-professional work, DIY is often sufficient; if you require maximum soundproofing and consistent quality, investing in professional solutions is justified. Balancing these factors ensures you make an informed choice that aligns with your goals and resources, leading to a more satisfying and effective studio environment.
Common mistakes to avoid when setting up your closet studio
Don’t treat only one wall or rely solely on foam. Soundproofing and absorption require coverage and proper placement. Remember: foam absorbs but doesn’t block sound, so sealing gaps and using dense materials are vital for effective isolation. Avoid sealing the closet completely without ventilation — heat buildup can damage equipment and reduce performance. Always include airflow solutions like vents or fans to prevent overheating. Don’t forget the door. Neglecting door gaps is a common mistake that lets noise leak. Seal every crack with weatherstripping or blankets, and consider adding a door sweep. Lastly, rushing the setup without testing your space first can lead to wasted effort. Use a loud clap or a microphone test to identify reflection hotspots and low-end issues. Iterative testing allows you to refine your treatments and placement, ensuring your space is optimized for sound quality and noise containment.
Understanding common pitfalls is vital because overlooking them can lead to ineffective treatments, persistent noise leaks, or overheating. For example, sealing gaps without considering ventilation can cause heat buildup, damaging equipment or reducing comfort during long sessions. Rushing into treatments without testing may mean you miss critical reflection points or low-frequency issues, forcing costly and time-consuming adjustments later. Additionally, relying solely on foam without sealing gaps or addressing low-end resonances can make your setup less effective, resulting in a space that looks good but underperforms acoustically. Recognizing these pitfalls and planning accordingly ensures your efforts lead to a functional, comfortable, and acoustically optimized studio that meets your needs without unnecessary setbacks.
Your quick-start checklist for turning a closet into a quiet studio
- Identify the primary reflection points: behind the mic, side walls, ceiling.
- Seal gaps on the door and around vents.
- Place absorption materials at reflection points: foam, blankets, panels.
- Add bass traps in corners for low-end control.
- Set up your microphone on a stand or isolation pad.
- Put a soft rug or carpet on the floor.
- Test with a loud clap or mic check, then tweak placement.
- Ensure good ventilation—use fans or vents if needed.
Frequently Asked Questions
Is a closet good enough for recording vocals or voice-over?
Yes, a closet can work well for vocals or voice-over if you treat it properly. Focus on reflection control, sealing gaps, and adding bass traps for a clear, professional sound. The key is good placement and absorption, not just foam.
What’s the difference between soundproofing and acoustic treatment?
Soundproofing blocks sound from leaving or entering a space, usually through sealing gaps and adding mass. Acoustic treatment reduces echoes and reflections inside the room, making recordings clearer. Combining both gives the best results.
Where should I place the microphone in a closet studio?
Place your mic about 6-12 inches away from the wall behind it, aimed at the most absorbent surface. Avoid corners, and use a stand or isolation pad to prevent vibrations. Test with a clap to find reflection hotspots.
How much wall coverage do I need for effective absorption?
In small closets, covering about 70-80% of the reflective surfaces with panels or blankets makes a big difference. Use thicker panels (2-4 inches) for better low-frequency control, especially in tighter spaces.
Conclusion
Your closet can become a surprisingly good studio — if you treat it smartly. Prioritize placement, sealing gaps, and combining absorption with ventilation. It’s about work smarter, not harder.
Picture your setup: a quiet, focused space where your ideas flow without distraction. That’s the power of thoughtful acoustic design in a small space. Get it right, and silence becomes your secret weapon.