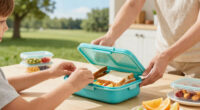
This guide helps parents and caregivers choose the right lunch box containers for kids, pack nutritious meals efficiently, and maintain containers for long-term use. It covers selecting safe materials, packing properly, and cleaning routines. Designed for beginners, it ensures you can confidently prepare kid-friendly, leak-proof, and durable lunch containers that keep food fresh and organized.

TOUWMX Bento Box for Kids, 4 Pack, 3 Compartments Reusable Lunch Containers
- ✔ Material: Wheat straw and food grade PP
- ✔ Number of containers: 4
- ✔ Color options: Pink, beige, blue, green

OmieBox Kids Bento Box – Insulated Leakproof Lunch Container with 3 Compartments and Stainless Steel Food Jar – Blue Sky
- ✔ Material: Plastic, Silicone, Stainless Steel
- ✔ Recommended age: 3+ Years
- ✔ Insulation: Vacuum Insulated Food Jar

Buluker 4 Pack Bento Lunch Box Set – 3 Compartment Food Storage Containers, Microwave and Dishwasher Safe
- ✔ Material: Polypropylene and wheat fiber
- ✔ Number of containers: 4
- ✔ Compartments per container: 3
Difficulty: Beginner | Time: 20-30 minutes
What You’ll Need
Tools & Materials:
- variety of lunch box containers (plastic, stainless steel, silicone)
- labels or markers for naming
- small reusable containers or dividers
- cleaning supplies (dish soap, sponge, brush)
Knowledge:
- basic understanding of food safety
- awareness of child’s dietary needs
- ability to read and follow container care instructions
Prepare a clean space for packing and cleaning containers. Check container materials for safety certifications (BPA-free, food-grade). Have a list of favorite kid-friendly foods ready for packing.

TOUWMX Bento Box For Kids, 4 Pack 3 Compartments Meal Prep Containers Reusable Lunch Containers, Food Storage Containers With Lids, Stackable Snack Boxes for School, Work, and Travel
【Wheat Straw Bento Box 】: The 3-compartment bento lunch box is made of durable wheat straw and food...
As an affiliate, we earn on qualifying purchases.
TOUWMX Bento Box for Kids, 4 Pack, 3 Compartments Reusable Lunch Containers
This set stands out for its durable wheat straw material and three-compartment design, making it ideal for portion control and eco-conscious families. Compared with the OmieBox, it lacks insulation, so hot or cold foods won’t stay at the right temperature. It also isn’t leakproof for liquids, but it’s dishwasher and microwave safe—if lids are removed. This makes it a solid choice for balanced meals but less suited for soups or liquids.
Pros:
- Eco-friendly wheat straw material
- Three compartments for portion control
- Stackable, leakproof (not for liquids)
- Microwave, freezer, dishwasher safe
Cons:
- Not suitable for liquids due to leakproof design
- Lid must be removed for microwaving
- Hand wash recommended for lids
Best for: Parents seeking eco-friendly, portion-controlled lunch boxes for school or travel
Not ideal for: Those needing to carry liquids or hot foods over long periods
Bottom line: A durable, eco-friendly choice perfect for portion control but not ideal for liquids or hot foods.
“A durable, eco-friendly choice perfect for portion control but not ideal for liquids or hot foods.”

Omie OmieBox Kids Insulated Leakproof Bento Lunch Box with Food Jar (Blue Sky)
KIDS EAT BETTER — With OmieBox, you can pack more variety and keep their favorite foods at just...
As an affiliate, we earn on qualifying purchases.
OmieBox Kids Bento Box – Insulated Leakproof Lunch Container with 3 Compartments and Stainless Steel Food Jar – Blue Sky
The OmieBox excels at maintaining food temperature, thanks to its vacuum-insulated stainless steel jar. It’s designed for children 3 and up who need their hot foods warm and cold foods cold for hours, making it perfect for varied meals. Compared with the TOUWMX, it’s heavier and bulkier, which could be a drawback for kids with smaller backpacks. Its sturdy build and removable seals make cleaning straightforward, but caution is advised when handling hot water or foods. Overall, this box is ideal for parents prioritizing temperature retention over weight.
Pros:
- Keeps hot and cold foods at optimal temperatures
- Durable, high-quality materials
- Removable, replaceable seals for easy cleaning
Cons:
- Heavier at 1.7 lbs
- Bulkier design may be less portable for small bags
- Care needed when handling hot contents
Best for: Families seeking a reliable insulated lunch solution that keeps hot meals hot and cold foods chilled
Not ideal for: Children who prefer lightweight, simple containers or carry liquids frequently
Bottom line: Best suited for those who value temperature retention, willing to accept extra weight and size.
“Best suited for those who value temperature retention, willing to accept extra weight and size.”

buluker 4 Pack Bento Lunch Box Set 3 Compartment Food Storage Containers Wheat Straw Meal Prep Lunch Box Plastic Food Storage Containers, Microwave and Dishwasher Safe (light colour)
【3 Compartment Design】 Three perfectly portioned compartments for the bento box allows you to store different food separately,...
As an affiliate, we earn on qualifying purchases.
Buluker 4 Pack Bento Lunch Box Set – 3 Compartment Food Storage Containers, Microwave and Dishwasher Safe
The Buluker set shines for its lightweight, stackable design and the use of high-quality polypropylene and wheat fiber. It’s an excellent choice for parents who want to maximize space and ease of use, especially for on-the-go kids. Compared with the TOUWMX, it’s less eco-friendly but more portable, making it ideal for children who need a simple, fuss-free container. The lids require removal before microwaving, which can be slightly less convenient, and color options are limited, but overall, it offers reliable, everyday functionality.
Pros:
- Lightweight and portable
- Three compartments for portioning
- Microwave, dishwasher, freezer safe
- Stackable design saves space
Cons:
- Lids must be removed before microwaving
- Limited color choices
- Less eco-friendly materials compared to wheat straw
Best for: Parents needing a portable, space-efficient lunch box for active children
Not ideal for: Those looking for insulated containers or carrying hot liquids regularly
Bottom line: A practical, lightweight set perfect for busy kids and space-conscious parents, with some limitations on insulation and color variety.
“A practical, lightweight set perfect for busy kids and space-conscious parents, with some limitations on insulation and color variety.”
As an Amazon Associate we earn from qualifying purchases.
Before You Start
Inspect all containers for cracks, damages, or missing parts. Wash all containers thoroughly before first use. Confirm the child’s dietary restrictions or preferences. Ensure the packing area is sanitized.
Step-by-Step Instructions
Step 1: Select appropriate lunch box containers
Choose containers made from safe, durable materials like BPA-free plastic, stainless steel, or silicone. Consider size, compartment options, and ease of opening for your child’s age.
Tip:Opt for containers with multiple compartments or dividers to separate different foods and prevent mixing.
Check: The container fits the lunch items without overstuffing and is easy for the child to open and close.
Step 2: Prepare the lunch box containers
Wash all containers, lids, and accessories with warm, soapy water. Rinse thoroughly and dry completely before packing.
Tip:For added cleanliness, sanitize containers periodically using a vinegar solution or dishwasher if dishwasher-safe.
Check: Containers are clean, dry, and free of residues or odors.
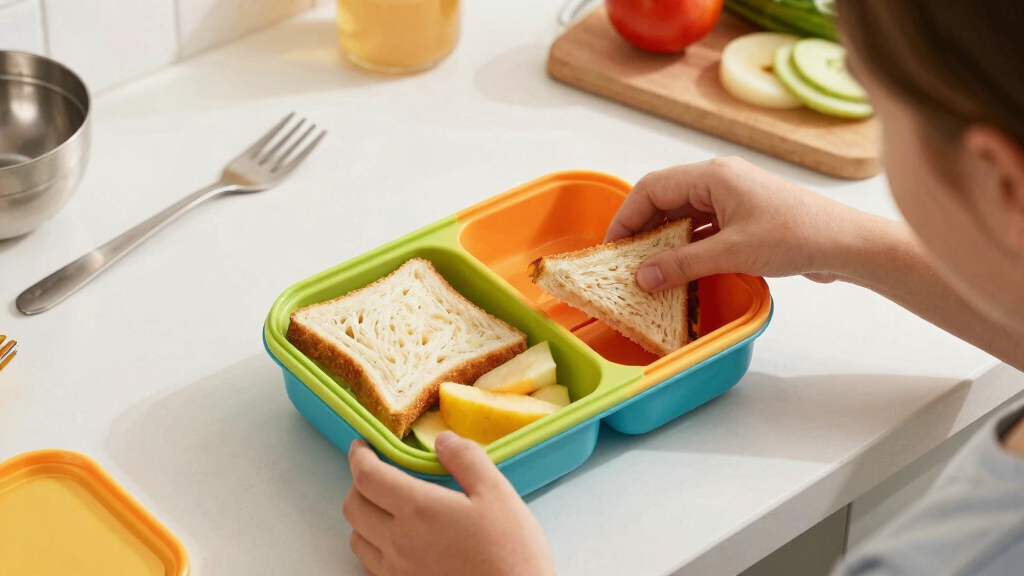
Step 3: Pack the food items into containers
Place foods into the compartments or small containers, avoiding overfilling to prevent leaks. Use reusable dividers if needed to keep foods separate.
Tip:Wrap delicate items like sandwiches or fruits with reusable wraps or silicone cups to maintain freshness.
Check: Food is securely packed, with no spills or squished items, and the containers close tightly.
Step 4: Label the containers or lunch box
Write your child’s name on the containers or lunch box with waterproof labels or markers to prevent mix-ups.
Tip:Use color-coded labels or stickers for quick identification.
Check: Labels are clear, legible, and securely attached without peeling or smudging.
Step 5: Sanitize and maintain containers regularly
After use, wash containers immediately with warm, soapy water. Check for stains or odors and scrub as needed. Allow containers to air dry completely before next use.
Tip:Inspect for damage or wear, replacing any cracked or damaged containers promptly.
Check: Containers are clean, odor-free, and in good condition, ready for the next use.
Common Mistakes to Avoid
- Using inappropriate materials like non-food-grade plastics. — Always select containers labeled as food-safe, BPA-free, and dishwasher-safe.
- Overfilling containers, causing leaks or squished foods. — Pack foods carefully, leaving space to prevent pressure and leaks, and use dividers if necessary.
- Not cleaning containers thoroughly, leading to odors or bacterial growth. — Wash containers immediately after use with hot soapy water and dry completely.
- Failing to check for container damage over time. — Regularly inspect containers for cracks or warping and replace damaged ones promptly.
Troubleshooting
Problem: Food leaks or spills during transport.
Solution: Ensure lids are sealed tightly, and use containers with secure locking mechanisms or silicone seals.
Problem: Containers develop odors or stains.
Solution: Wash with baking soda or vinegar solutions, or replace if odors persist after thorough cleaning.
Problem: Child struggles to open containers.
Solution: Choose containers with easy-open lids or ergonomic designs suitable for your child’s hand strength.
Problem: Food gets soggy or spoiled quickly.
Solution: Pack moist foods separately in airtight containers, and include ice packs if needed for long transport.
What Success Looks Like
The lunch box contains well-packed, fresh, and organized foods that are easy for the child to open, with no leaks or messes. Containers are clean, odor-free, and in good condition.
Next Steps
Establish a routine for packing and cleaning containers daily. Rotate different container styles for variety. Replenish supplies as needed. Seek feedback from your child to improve packing habits. Replace damaged containers promptly to maintain safety and functionality.
Frequently Asked Questions
What materials are safest for kid’s lunch boxes?
Look for containers made from BPA-free plastic, stainless steel, or silicone, which are food-safe, durable, and easy to clean.
How do I prevent leaks in lunch box containers?
Choose containers with secure, locking lids or silicone seals, and avoid overfilling. Test lids before packing to ensure they close tightly.
How often should I replace lunch box containers?
Inspect containers regularly for cracks, warping, or odors. Replace any damaged containers immediately to maintain safety and hygiene.
Can I microwave plastic containers?
Only microwave containers labeled as microwave-safe. Always check manufacturer instructions before reheating food.
How do I keep food fresh during long school days?
Use insulated lunch boxes with ice packs and pack moist foods separately in airtight containers to prevent spoilage.